So have you ever been confronted with a problem where a kitchen faucet nut under the sink is loose? Silly question right? Everyone has had this problem at one point or another. You probably already know that if you ignore it, it can get out of hand pretty quickly. And even if it hasn’t yet for you, just knowing that it could is stressful enough to make you want to fix it ASAP.

What Are The Common Causes Of A Loose Or Wobbling Faucet?
Your kitchen faucet is an essential part of your kitchen you can’t afford to ignore. If it becomes loose, there’s a very good chance that more serious problems could present themselves in the future. Before we tell you how to tighten a loose kitchen faucet nut under sink, let us tell you why it happens in the first place.
Loose or damaged mounting nuts
A loose nut is the most common cause for a loose or wobbling faucet. Tightening a loose nut will often fix the problem, but it’s possible that the nut has become stripped and won’t tighten anymore.
Loose or damaged bolts or screws
Sometimes the threads on a bolt are damaged or worn down so much that they don’t grip enough anymore; this is especially common if the bolt has been overtightened in the past. If you replace a damaged bolt with one of the same size, make sure to use the plumber’s putty on both sides of the flange to ensure a snug fit.
Worn out/damaged faucet body
If there is still some movement between your sink and your faucet, check your faucet to see whether it has started to leak. If so, this may mean that you need to replace the faucet itself.
Loose or damaged handle
Sometimes, it just gets loose over time, and you need to tighten it back up. Other times, the handle is a little loose because something has broken inside the faucet head and needs to be replaced.
Tighten Faucet Nut Under Sink Step-by-step Guide
Tightening a kitchen faucet is not difficult. If someone in household is handy, he can do it without any sweat. With a little patience and the right tools, it can be done by anyone. Here is a step-by-step guide on how to tighten a kitchen faucet nut under the sink. Before you begin the operation, make sure that you have all the necessary tools:
- Basin wrench
- Adjustable wrench
- Screwdriver
- Flashlight

Source: Amazon
Step 1 – Turn Off Water Supply
The first step is to turn the water off. This can be done at the shut-off valve under the sink. If you don’t see a shut-off valve, check the pipes coming out of the wall near where the faucet is installed. If you don’t see one there either, look behind your home’s main water meter.
Step 2 – Clear Space Under Sink
Remove any items on or around the basin where you’ll be working. The space under your sink may also be limited by pipes and other components, so make sure there’s enough room for you to maneuver.
Step 3 – Adjusting The Faucet
Next, adjust your faucet if needed. If your faucet isn’t in the right position, loosen it by loosening the mounting nut underneath. After you have loosened the mounting nut, you will have to move your faucet up so that it is in line with the drain hole in your sink and then tighten it back.
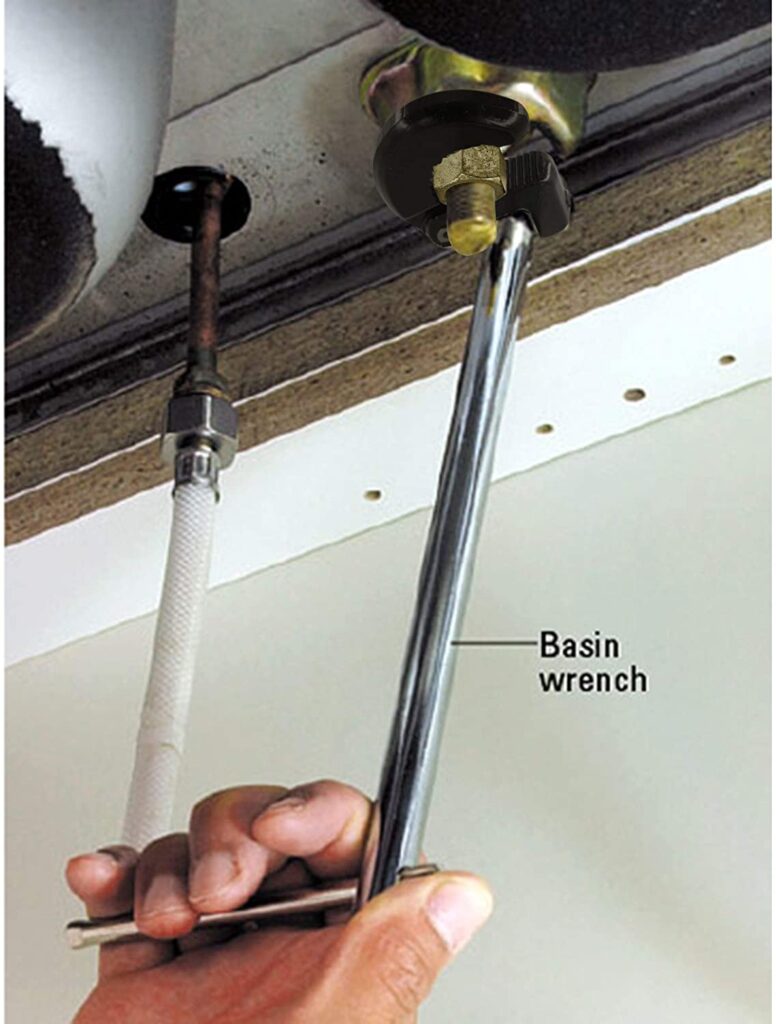
Step 4 – Tighten Faucet Nut Under Sink Using Basin Wrench
In order to tighten the faucet mounting nut, you need to use a basin wrench. This is a special wrench with a long handle for reaching into deep basins and tubs. The handle of this tool has teeth that fit the teeth on the base of the faucet. When you turn the handle, you turn the nut.
Step 5 – Restore Water Supply
After you tighten the nut under the sink you can check if the faucet still wobbling. If everything is in place you can restore the water supply.
How To Tighten Faucet Bolt Under Sink?
Tightening a faucet bolt under the sink is a simple procedure that can be completed in less than five minutes. If the bolt is loose, or if you want to prevent it from becoming loose in the future, then tightening it is essential. Tighten the bolts with a hex wrench if your faucet has them. If your faucet has screws, you can use a screwdriver with a longer handle to tighten them. Another option is to use a socket set. Faucet bolts sometimes get loose for a number of reasons:
- The material of the threads holds lubricant against corrosion, but over time that lubricant wears down, causing the bolt to loosen.
- Change in temperature causes expansion and contraction which loosens the bolt.
- Over time, friction may have caused the threads on the bolt to become damaged or worn down.
- A build-up of calcium in hard or soft water over time can cause the same thread damage as reason
How to Tighten Kitchen Faucet Handle?
Tightening a loose kitchen faucet handle is not an expensive task, but it is necessary if you want to make sure that your kitchen is safe for use. If you don’t fix this problem right away, there could be a lot of problems in the future such as leakage and other problems caused by leaking water around your home.

If the handles of your kitchen faucet are loose, you will have to tighten them. Here are the steps that you need to follow:
Step 1 – Turn Water Off
Shut off the water supply and drain any remaining water from the faucet.
Step 2 – Find the handle screw
Locate the bolt handle. They are located at the base of the handle, where it attaches to the spout
Step 3 – Unscrew The Bolt
Use a screwdriver to remove the screws and lift out the handle. Pull off the handle, being careful not to let it fall into the sink basin.
Step 4 – Check The Handle
Clean around the base of the faucet and attach the handle. At this step, it’s better to check the stem and handle for any tear and rust.
Step 5 – Tighten the handle screw
Tightening this screw ensures that the handle will stay in place and no longer come loose. Turn the water supply and test the faucet for any leaks or wobbling
How To Remove A Stuck Kitchen Faucet Nut Under Sink?
When you need to tighten the faucet or replace it with a new one there are high chances that the faucet nut under the sink gets stuck. This happens because the nut has been in place for some time and water has dried upon it. Also, minerals and salts build up inside the nut making it harder to loosen. There are a few ways to remove a stuck nut. Some work better than others, depending on the materials and the tools you have available.
1. Tighten The Nut
The first thing you should try is to give the tap a few more turns, this sometimes causes the rust and minerals to spill out and it will be easier to unscrew.
2. Use A Lubricant
The second option is a lubricant. WD-40 is good for this purpose, so is grease or petroleum jelly. Spray or lubricate the threads of the faucet and then try to turn it again. If this works, you’re done — just clean off any residue from the lubricant and use the faucet again. If it doesn’t work, there are a few more options.
3. Using A Hammer
A lot of people have had luck by banging on the faucet nut with a hammer or hitting it with a wrench. This can be risky and might not work, but you should definitely try it before you take things apart further.
4. Applying Heat
Sometimes a stubborn nut will come loose after you apply heat from a hairdryer or a heat gun for about ten minutes. Don’t heat the entire fixture; just aim the hot air at the nut. When none of these methods works, cut off the stuck nut with a hacksaw or Dremel tool. Then replace it with a new one of about the same size and shape.

Final words
Hopefully, the steps and instructions above have helped you tighten your loose faucet. In doing so, you’ll be able to save some money and avoid much of the hassle that often comes with a call to a plumber.
The best faucets are valuable tools in any home, but they also serve as a major point of annoyance. With a little know-how however, even the clumsiest of people can fix a loose kitchen faucet in their home. If anything else is unclear, or if you feel there is another step we left out that should be included, please let us know in the comments below and we will help resolve any issues you may have.